Jun 14, 2016

VOIP LAB DAY 15 Adding Skype for Business 2015 Part 5
Receiving external calls at Skype for Business 2015..

Now that you can make call to the PSTN numbers using your Skype client, wouldn't be nice to be able to receive external calls with your Skype for Business client?
 In order to rceive calls to your Google Voice number with your Skype for Business client, you need to edit /etc/asterisk/extensions.conf file as below.

root@IncrediblePBX:/etc/asterisk $ nano extensions.conf

and scroll down (Ctrl V) till you see [from-trunk]. Now add the line as shown below. 
In this case 3332224444 is your Google Voice number and 12345 is your Skype for Business user's extension.

exten=> 3332224444,1,Goto(from-internal,12345,1)
include => from-pstn


After you done with editing, do

root@IncrediblePBX:/etc/asterisk $ asterisk -rx "dialplan reload"
Dialplan reloaded.


One more thing.. You need to select "Forwards calls to Google Chat" on your Google Voice account setting


Now you should be able to receive calls to your Google Voice using your Skype for Business 2015 client.


VOIP LAB DAY 14 Adding Skype for Business 2015 Part 4

Since this blog is for Skype/Lync admins, you should already familiar with how the Skype/Lync side should be configured. So I will not go too much detail on how to configure Skype for Business. At this point you have a working PSTN gateway and you should be able to make calls to the PSTN world. 

Basically you need to create a route and assign the SIP Trunk you created using the PBX in a Flash. The pattern to match should catch all numbers for testing. 


VOIP LAB DAY 13 Adding Skype for Business 2015 Part 3


We are almost there. Last time we successfully made call from soft phone connected to the PBX to Skype user. Now we need to be able to make call from Skype to PBX and to the PSTN. If you followed the instructions so far, we made SIP port on PBX set to 5060. We need to change the port for Chan_PJSIP to something else so the Chan_SIP can listen on 5060 instead of Chan_PJSIP. Follow the below instruction to change the port used by Chan_PJSIP. 


Open your Incredible PBX web admin and navigate to Setting, Asterisk SIP Settings.

Click on Chan_PJSIP. Change the port 5060 to 5062.  Submit and Apply Config. 


After you change the port on Chan_PJSIP, you need to reregister your soft phone with correct port as below.


VOIP LAB DAY 12 Adding Skype for Business 2015 Part 2

Now we are ready to add the SIP trunk to the PBX. 
Open your Incredible PBX web admin GUI. Navigate to Connectivity, Trunk


Click on Add SIP (Chan_SIP) Trunk.  Enter the name of the trunk, leave everything blank except for PEER details.  Enter the PEER details as below.  You need to enter the trunk name twice..User Details need to be blank. 

host=IP Address of the Skype Mediation Pool (or the Front End if Mediation role coexists.)
transport=tcp
port=5060
insecure=very
type=friend
context=from-internal
promiscredir=yes
qualify=yes
canreinvite=yes
allow=alaw


After you Submit and Apply Config, navigate to Connectivity Inbound Route. Enter description and DID Number as ANY. Scroll all the way to the bottom of this page and enter your S4B trunk info.


Submit and Apply Config. Navigate to Connectivity, Outbound Route. 
Enter the Route name (No space) , Dial pattern, (In this case 5 digits as Skype extension will use 5 digits) and Trunk name at the bottom. 


SSH to the PBX and run "amportal restart".  Verify the SIP Trunk is up and running by typing asterisk -rx "sip show peers" 

root@IncrediblePBX:~ $ amportal restart

Please wait...


STOPPING ASTERISK
Waiting for Asterisk to Stop Gracefully...

Asterisk Stopped 

SETTING FILE PERMISSIONS.................Done
Removing any dangling symlinks
Dangling symlinks removed

STARTING ASTERISK
Asterisk Started
WARNING: Always run Incredible PBX behind a secure hardware-based firewall.  
root@IncrediblePBX:~ $ asterisk -rx "sip show peers"
Name/username             Host                                    Dyn Forcerport Comedia    ACL Port     Status      Description                      
Skype For Business        192.168.0.115                               Yes        Yes            5060     OK (109 ms)                                  
1 sip peers [Monitored: 1 online, 0 offline Unmonitored: 0 online, 0 offline]
WARNING: Always run Incredible PBX behind a secure hardware-based firewall.  
root@IncrediblePBX:~ $ 

You should see OK status for your SIP trunk. 

You should also see SIP OPTIONS and OK if you trace packet with Wireshark


At this point, you should be able to call your Skype user with 5 digit extension from your soft phone. 


VOIP LAB DAY 11 Adding Skype for Business 2015 Part 1


In my lab, I have already installed Skype for Business 2015 Standard Edition. You also need to have at least one domain controller as Skype cannot be installed on domain controller. You should have functioning Skype for Business Server 2015 in order to proceed.  The S4B front end pool should also have Mediation role co-exiting unless you want to set up stand alone mediation pool.

Create a new PSTN gateway using the IP address of your PBX. You will need to publish the topology after adding the new PSTN gateway.


VOIP LAB DAY 10 Adding Google Voice

Welcome back to My VOIP LAB. Today we will continue the configuration of  PBX in a Flash to act as PSTN gateway for Skype for Business.

Finally we are at the point where we can connect PBX to our Google Voice account. If you do not have Google Voice already, please sign up and get a Google Voice number.

There is one important setting on Google account. In the Google Account Security setting, you need to turn on "Allow less secure apps".


Now, go back to your Incredible PBX and navigate to Connectivity, Google Voice. Go to Connectivity, Google Voice. Enter your Google ID, Password, and the Google Voice Phone Number. 
Make sure to click Add Trunk and Add Outbound Route as well. 


After you enter all the info, click Submit, Apply Config You should see the green status as shown below. 


At this point, you should be able to make calls to PSTN world using your soft phone. 


VOIP LAB DAY 9 Learning Asterisk Basics

Welcome back to My VOIP LAB. Today we will continue the configuration of  PBX in a Flash to act as PSTN gateway for Skype for Business.

If you have followed the instructions so far, you now should have a working PBX and you should be able to make calls within the PBX using soft phone. Now is a good time to pause and do some learning on basics on Asterisk. I would like to refer you to the youtube channel by the VOIP Guys (https://www.youtube.com/watch?v=jMQfSsO1da4). You should at least go through the tutorial 13 where they cover the variables. Each tutorial is very short. You will save a lots of troubleshooting time later by going through those tutorials. 
VOIP LAB DAY 8 Configuring the SIP setting on the PBX

Welcome back to My VOIP LAB. Today we will continue the configuration of  PBX in a Flash to act as PSTN gateway for Skype for Business.

After you enabled TCP on the PBX by editing /etc/asterisk/sip.conf file connect to back to the GUI admin using your browser. Navigate to Settings, Asterisk SIP Setting. Whenever you change setting on GUI, you need to click on submit change at the bottom and click on Apply Config . 


In the General SIP setting, enter your subnet info. If your home network is on 192.168.0.0 with netmask of 255.255.255.0 it would be 192.168.0.0/24, if 255.255.0.0, it would be 192.168.0.0/16.


Navigate to Chan_SIP setting and enter the following configuration. Note: Select NAT=yes and Public IP. 


Navigate to CHAN_PJSIP setting and enter the following .


Now it is time to create an extension. For Skype/Lync admins, extension can be understood as an account.. extension is the unique number with a password, or SIP secret as it is called.  Navigate to Applications, Extension on the adim GUI. 

Select Generic PJSIP device and slick submit.  On the next screen, all you need to enter is Extension, Display Name and Secret.  After you enter those 3, Submit and Apply Config. 


Now you can log into the PBX with your soft phone. I am using Zoiper in this example. 


You should be able to create additional extension and make call to each other at this point. 


Jun 11, 2016

VOIP LAB DAY 7 Enabling TCP on Asterisk

Welcome back to My VOIP LAB. Today we will continue the configuration of  PBX in a Flash to act as PSTN gateway for Skype for Business.

After you set up your PBX with a static IP, try reconnecting to it with SSH. Before you reconnect, you may beed to delete your .ssh folder in home directory.

The second thing you need to configure on the PBX, and this is pretty important, is to enable TCP on the PBX. By default Asterisk uses UPD for SIP. There are numerous articles and instructions out there explaining that you can turn TCP on the Web admin GUI.. This never worked for me. I needed to edit /etc/asterisk/sip.conf file to enable TCP on Asterisk.. This is especially tricky since Skype for Business always uses TCP for SIP. Asterisk by default uses UDP, they never talk to each other unless you make Asterisk talk TCP. To make things worse, there are articles that say you should never touch the sip.conf file.. Well in this case the only way to do it is to edit sip.conf file.. and here is how you should do it.

Connect to your PBX with SSH or telnet.

Use nano to edit the sip.conf file.

root@IncrediblePBX:/etc/asterisk $ nano sip.conf

Insert those two lines right beneath [general]
[general]
tcpenable=yes
tcpbindaddr=0.0.0.0


Do Ctrl o and Ctrl x to save and exit nano.

Restart Asterisk by doing "amportal restart"

root@IncrediblePBX:/etc/asterisk $ amportal restart

Please wait...


STOPPING ASTERISK
Waiting for Asterisk to Stop Gracefully...

Asterisk Stopped

SETTING FILE PERMISSIONS.................Done
Removing any dangling symlinks
Dangling symlinks removed

STARTING ASTERISK
Asterisk Started
WARNING: Always run Incredible PBX behind a secure hardware-based firewall.
root@IncrediblePBX:/etc/asterisk $


VOIP LAB DAY 6 Configuring the Network Interface on PBX

Welcome back to My VOIP LAB. Today we will continue the configuration of  PBX in a Flash to act as PSTN gateway for Skype for Business.

If you have followed the screen shots so far, you should be looking at your PBX admin screen as below. The first thing you should set up on this PBX box is to set a static IP address and default gateway. Follow the below screenshots to set static IP address.


Click on the sliding bar at the left bottom and open the admin page. 


Click on the Webmin button.  When warned about a security exception, accept it. Use root as user name and the password you set for root. You should now be looking at below screen.

On the left menu bar, expand Networking and click on Network Interfaces.


Click on eth0, which is your interface connecting to the home network. 


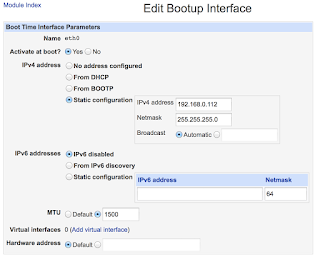
Enter your static IP and netmask. 


In the Routing and Gateway, make sure you enter your default gateway for your home network.


Click on Save and Apply. If the IP address you specified is different from the current IP, you will obviously need to reconnect to the Webmin console with the new IP address. 


VOIP LAB DAY 5 Accessing the Incredible PBX.

Welcome back to My VOIP LAB. Today we will configure PBX in a Flash to act as PSTN gateway for Skype for Business.

If you have followed the screenshots so far, you should have your IP address of your PBX. Bring up a browser and access that IP address. You should see the following page.


At this point you should also be able to SSH to the PBX as well. Bring up a SSH client like Putty or 
if you have a mac, you can open a terminal window and just type:

ssh -l root "your PBX's IP address"

Accept your SSH message and a warning from PBX and you should see the below screen. Click OK.


If you see below lines,  you are logged into PBX.

WARNING: Always run Incredible PBX behind a secure hardware-based firewall.  
root@IncrediblePBX:~ $ 

The first thing you need to do is to reset admin password on the PBX. Some instructions on the Internet indicate that you will be given a chance to set admin password for your PBX during the install but somehow I never saw that option for my install.. but you can reset admin password by running the below command from the SSH console. 

root@IncrediblePBX:~ $ ./update-passwords

The script will reset your root and admin passwords and also some of your pin numbers for your PBX. You will need admin password to access your web admin page. 

Go back to your browser and click on this slide bar at the bottom. 


Now you should see this screen which has the button for your Incredible PBX admin page. 


Click on the "incredible PBX Administration" button. 


You need to enter you admin as your user name and password for it. 
You should now see this screen. 


VOIP LAB DAY 4 Installing PBX in a Flash

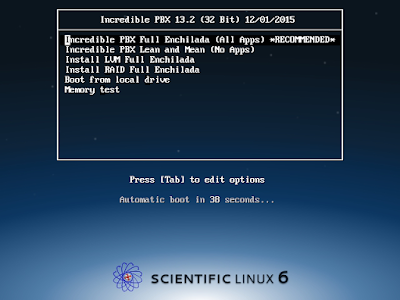
Welcome back to My VOIP LAB. Today we will continue the installation of PBX in a Flash on Oracle VirtualBox. If you followed the screenshots so far, your Oracle VirtualBox should be showing the bellow screen.

VERY IMPORTANT: During the install, you will be asked to select either enable OAUTH for Google Voice or use plain text. Please select Plain Text (option 1) for this. 

You should select the recommended option for this.

Select your time zone here


Enter your root password. Please write down your password somewhere!


For Google, select either 1 or 2. I had an issue when this screen came up. It did not allow me to type in anything.. I ended up selecting 1 for the first installation. 


Use the user name root and the password for root account you entered earlier. 


Your installation is complete once you get to this screen. Write down the IP address assigned by your home router's DHCP server. You will connect to this IP using a web browser. Please make sure GV OAUTH shows DN.